Tuesday, December 1, 2015

Contractors - What to Scrutinize and Why


With the approach of winter, this is the time to hire a contractor for any painting or carpentry jobs that you might want to have done before the next rental season. As you probably know, it can be difficult to get estimates in the spring on the Outer Banks, since most reputable contractors will be booked.

Do yourself a favor and take the time to scrutinize the companies that you invite to bid on your work. Not all companies can competently estimate the work they perform. It may not seem that a low-ball price should be of concern to you, but that is usually far from true. What happens when the contractor figures out he’s blown the budget…or if he runs out of money?  Often this results in the contractor cutting corners (proper prep work is usually the first thing to go) and you may end up with a paint job or repair that only lasts long enough for him to cash your check.

Many residential contractors don’t have the knowledge, skill, or time to accurately measure and apply production rates, so it’s no surprise that they are simply guessing rather than estimating their jobs. In some cases, that guess may be an educated one, but it is still just a guess.  If you have ever hired a contractor, you know that the estimates can vary wildly in scope and price.


To estimate properly, a contractor must first measure all components of the work and apply the proper production and material spread rates. While this isn't very complicated, it does require plenty of time to accumulate the necessary data to establish these rates. For many small business owners, this simply never happens. Often they are too occupied working for the business rather than working on the business.

Look for professionalism in any contractor proposing to work on your home. It’s usually easy to spot. A contractor either has it, or he doesn't. When evaluating a proposal, look for the following:

  1. Is the proposal articulate? If the contractor can't explain the scope of work or the proposed materials and methods, will he be able to effectively manage the work?
  2. Does the contractor have insurance? Even the best contractors have occasional mishaps, but how these mishaps are handled is what separates the good from the bad from the ugly.
  3. Longevity. Will the contractor still be in business if you have a warranty claim?
  4. Trade organizations and references. If the contractor is a member of the local Homebuilders' Association or Chamber of Commerce, then he is likely serious about his business and has references you can contact. Your painting contractor should also be a member in good standing with the Painting and Decorating Contractors of America (PDCA). You can access a list of PDCA members in your area or call 1-800-paint-job.
The best price isn't always the best deal - especially if you have to call a professional to finish a job when the original contractor won't return your phone calls or has gone out of business. It will cost you more in the long run and the contractor who finishes the work will not be able to warrant anything done by the previous contractor.   

Monday, October 12, 2015

Fall Maintenance - 2015

Fall is my favorite season on the Outer Banks. The traffic hassles caused by the tourists are over, the beaches are serene, and we start getting back to our normal pace of work at Beach Painting. One can't help but feel thankful for the abundant natural beauty that surrounds us.

It seems distant, but Winter is coming. Freezing temperatures and snow are usually short-lived here; nonetheless, diligent homeowners should be mindful of the following maintenance items:
 
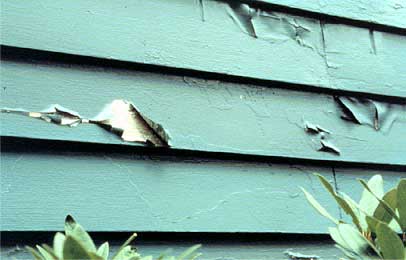
Address Peeling Paint
Peeling is a sign of paint or substrate failure. Once the paint film has failed it can no longer protect your siding. Peeling paint should be removed by scraping and sanding as soon as it becomes visible.
Photo: Address peeling paint as soon as possible.
The bare surface should then be primed and fresh paint applied. If left alone, exposed siding will be susceptible to premature deterioration and rot.
If your house is due for a repaint, Fall weather conditions are ideal for exterior painting on the OBX.
  
Replace Failing Caulk
Caulk helps to keep the heat in your home and the moisture out. If your caulk is cracked or failing, it should be completely removed at the point of failure and new caulk should be applied.

Protect Your Decks
On the Outer Banks, we have periods of extended precipitation and occasionally we experience freezing temperatures. Moisture, combined with freezing and thawing, can wreak havoc on your decks. Consider having them sealed in the Fall. This will reduce cracking and splitting and extend the life of your decks.

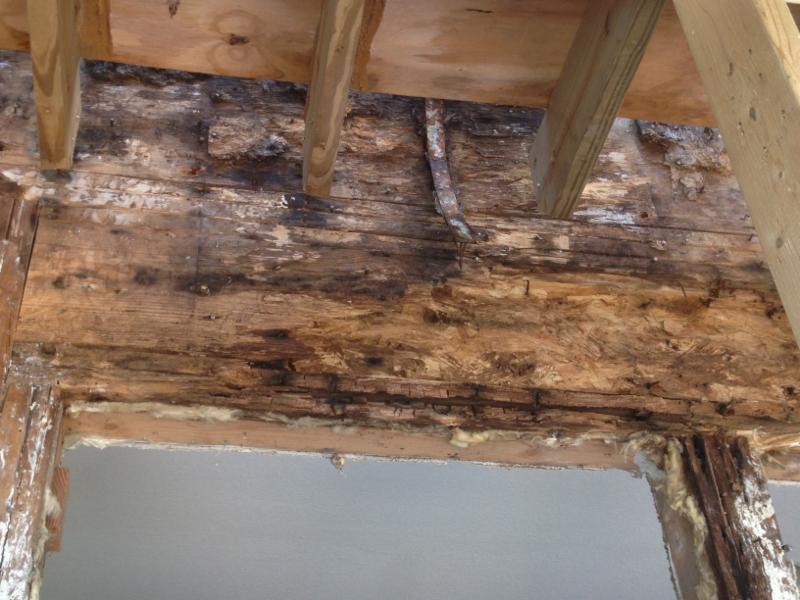
Check For Visible Signs of Rot
Photo: Extensive rot can take weeks or months to repair.
Water penetration leads to excessive moisture and inevitably causes wood rot. It can also create an ideal habitat for termites and ants. If you see signs of damage on your corner trim or door/window trim, it warrants further investigation.
 
Extensive rot can take weeks or even months to fully repair. You don't want to address the problem in the Spring when most reputable contractors will already have a full schedule. This could put your rental season in jeopardy.


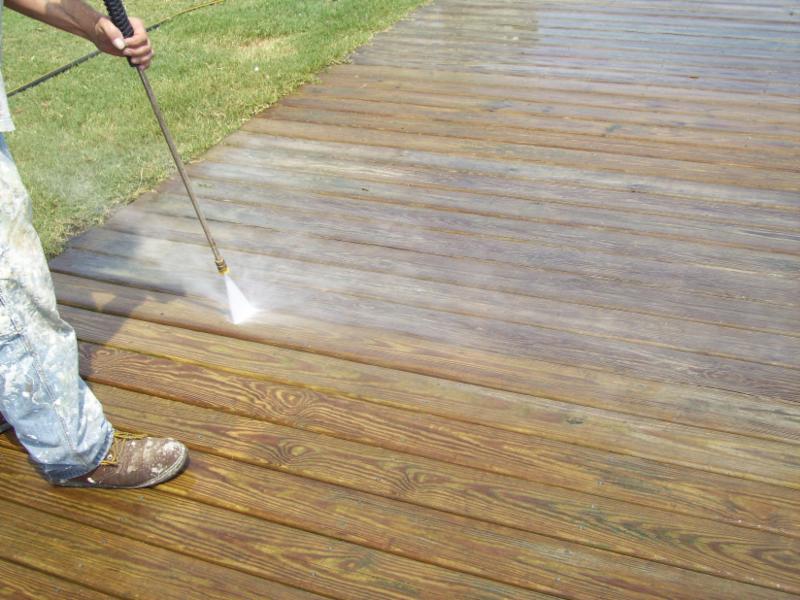
Power Washing
Photo: Power washing can reveal potential problems.
Power washing not only cleans your house and decks, but it can also reveal failed caulking, peeling paint, cracked deck boards and dry rot.

Other Items
Gutters, chimneys and roof shingles should be checked before winter. It's also advisable to test and replace the batteries in your home's smoke and CO detectors as well.

Fall is an ideal time to trim dead branches from your trees and aerate/seed your lawn. It's also a good time to remove your annual plants and divide and move your perennials as necessary.

This time of year is very busy for us at Beach Painting. Don't wait too long to schedule your maintenance painting and carpentry repairs. This is also a great time to schedule any interior painting and drywall repairs that can be done now or during Winter.
 
Give us a call at 800.663.4944 to request an estimate or visit our website to learn more about Beach Painting.

Wednesday, September 30, 2015

Paint Problems - Blistering


If bubbles begin to form in localized areas on your painted exterior surface after drying, this is known as blistering. The paint film may lift from the substrate in several small areas. 
photo: paint blisters
There are several possible causes for blistering. If a surface is hot and painted in direct sunlight, the paint may not completely adhere. The application of an oil-based paint on a wet surface will produce similar results. If you’ve used a latex paint, and the surface is exposed to high humidity, dew, or rain shortly after the paint has dried, this can cause blistering…especially if the surface was not adequately prepped (see my post on preparation).
 
A less common cause of blistering is moisture escaping through your exterior walls. Oil-based paints are more prone to this than are latex paints.
If the blisters settle and go back down to the substrate, try to remove the source of the moisture. Check your exterior caulking to make sure that is not the source of water infiltration. Also check your flashing.
If the blistering continues, the problem may be moisture escaping through your walls.  You may want to consider installing exhaust fans/vents if the blistering has occurred on a gable, though the solution could be as simple as adjusting the humidity on your thermostat (especially during winter months).
After addressing the source of the moisture, you may find that the blisters will go down and adhere to the substrate...your chances are better if you used a latex paint. If the blisters do not adhere, you’ll want to scrape and sand the areas, then prime and repaint with a quality exterior paint.
 
If your paint has blistered and you cannot determine the cause, call us today for a free consultation. We'll be glad to look at the problem and advise you regarding the proper course of action.


Thursday, September 17, 2015

Paint Problems - Mildew

Paint Problems - Mildew
 
 
photo: mildew on cedar shakes
On the Outer Banks, mildew is simply a fact of life. Heavily wooded areas (such as Southern Shores or Kitty Hawk) block the sunlight and the frequently damp air creates a perfect environment for mildew.

Mildew is actually fungal growth (usually black or gray). Walls with northern exposure and the underside of eaves are particularly prone to mildew.

Other causes of mildew include the use of low quality paint, failure to prime bare wood before painting, painting over a substrate on which mildew has not been removed, and applying paint in a very thin coat.

At Beach Painting, we use the highest quality paints available (all of which are mildew resistant). We spot prime bare wood before painting. We always chemically treat and wash substrates before applying paint and we apply the paint to achieve the highest possible dry film thickness.

If you encounter mildew, you can test by applying a few drops of household bleach to the area and then rinsing. If the discoloration disappears, it is probably mildew. It can be removed by taking a scrub brush and a diluted bleach solution (three parts water, one part bleach) to the area. Always wear rubber gloves and eye protection when doing this. Rinse the area thoroughly and apply primer to any bare wood before touching up with a high quality exterior paint.

The best overall solution is to incorporate the power washing of your home's exterior into your annual Fall or Spring maintenance. Call us today for a free estimate!


Friday, August 14, 2015

Prime Considerations

Selecting the Right Primer
 
If you’ve decided to tackle a painting project and you go to your local paint store, you may be surprised to learn how many different primers are available. A primer is used under a finish coat to provide adhesion to the substrate and seal any stains that may come through the finish coat. This is a crucial step in the painting process. 
           

Photo: Courtesy of Sherwin Williams
If you are painting pressure-treated bare wood outside, your best bet is an exterior acrylic primer. Since these are water-based, they dry quickly and clean up easily with soap and water. Most often used on hand rails and deck bands, this type of wood is the most difficult to keep paint on because it is smooth and impregnated with chemical preservatives. If the wood is not kiln dried after the chemical treatment, you should not paint for at least six months.

Acrylic primer is recommended for siding products. Some siding (LP “Smart Side,” for example) are already factory-primed, which allows you to paint directly without a dedicated primer.   

Cedar requires a product that will block the tannins from coming through the finish paint and a good slow drying oil is best for this. Cedar is used primarily because of the high tannin content, which allows the wood to last longer than most others. The tannins are oils in the wood that will eventually seep through most acrylics leaving a stain. Most wood siding on the Outer Banks is cedar, either shakes or lap siding and is subject to this leaching. The tannin blocking oil products generally take up to 48 hours to dry and clean up with mineral spirits.  

If you have rusty screws or nails, you will need a rust-inhibiting primer. All rust scale should be removed before priming. The idea is to build up a high mil thickness to block the stain from coming through. Once the  nail begins to rust inside the wood, the rust will continue to leach out and, unfortunately, become a matter of routine annual maintenance...as any painting contractor on the OBX will tell you.

Interior primers are used for everything from new drywall to wood trim to hiding water stains. For new smooth drywall, latex “surfacing primers” are best. These products are thick and meant to be sanded before the final coats are applied. The application amounts to a skim coat of drywall and is very effective in hiding seams, which are frequently noticeably after the drywall has been finished.

On textured drywall surfaces, inexpensive latex primers can be used as an alternative to the pricier flat latex finishes. There is no need for a thicker surfacing product. These primers are also good for drywall repair areas. If your finish is eggshell, satin, or semi-gloss, primer is essential to ensure that a flat spot is not evident when the areas is touched up or repainted.

If you have experienced a water leak, an interior stain blocking oil product will be required. These products typically dry fast and may require multiple coats to completely block the stain effectively.

           
If you intend to paint wood paneling, cabinets, or trim, you will need to use an oil primer that both blocks stains and sticks to glossy surfaces. The surface should be lightly sanded with 220-grit sandpaper before priming to ensure that the primer has a good bite. Most often, primers for glossy surfaces dry quickly and clean up with mineral spirits or alcohol.
 
Whatever your situation, your local paint dealer should have a recommended system of primer and finish to fit the need. Depending on your finish colors, your paint store may even recommend tinting the primer to allow for better coverage on your finish coat. Make sure to describe the project completely and remember to select a good grade of product for maximum longevity.


Friday, July 17, 2015

Paint Problems: Alligatoring

Alligatoring

If you see a pattern of cracking in your paint that resembles the scales of an alligator, this is what we in the painting business call…you guessed it “alligatoring.”

 
With recent advances in technology and the widespread use of latex paints, alligatoring is not as common as it was in the past.
 
Alligatoring is usually caused by the natural aging of oil based paints from temperature fluctuation. The constant expansion and contractor result in the loss of paint film elasticity. There are other causes as well. If a hard coating is applied over a softer (and more elastic) coating, the top coat can crack over time. That’s why it’s not recommended to apply an oil paint over a latex paint. Application of a topcoat while the primer or basecoat is still wet can also produce this effect.

OK, so how do I fix this problem?
 
Unfortunately, you need to remove the old paint. This usually involved scraping, sanding, and the use of a heat gun. You’ll want to take every possible precaution if you have reasonable suspicion that the paint contains lead. At a minimum, you’ll want a respirator.

After removing the old paint, you’ll need to clean the surface. If a glossy surface remains, it must be sanded dull.

Thursday, June 25, 2015

Painting - Preparation is the Key

Benjamin Franklin once said, "By failing to prepare, you are preparing to fail." While this is applicable to many aspects of life, it is particularly apropos to our philosophy at Beach Painting Contractors. More often than not, poor preparation leads to a significantly shorter lifespan when it comes to repainting your house. Conversely, diligent preparation can extend the life of your paint job.
 
To protect your home, your painting contractor needs to account for the following:
  1. Cleaning: Paint will not adhere to a dirty surface. It is imperative that a house be chemically treated to kill mildew and power washed to remove dirt and peeling paint.
  2. Scraping/Sanding: After sufficient drying time, any remaining peeling paint needs to be addressed by scraping. If not, the original paint will continue to peel after the new paint is applied. It is also critical to "feather" sand the rough edges where paint has been removed to diminish the chances of further peeling.
  3. Repairing Surface Flaws: Cracks and dings in your siding should be repaired with exterior spackle, caulk, or wood putty to prevent further deterioration and improve overall appearance.
  4. Caulking: This is a critical step in preventing moisture infiltration. Any caulk that is cracked or separating from the surface must be removed. A high grade exterior acrylic latex or elastomeric caulk must be applied to these areas. Special attention should be applied at all window, door, and corner trim.
  5. Rust Treatment: Rusty fasteners should be treated with a rust-inhibiting primer after removing loose rust scale.
  6. Spot Priming: all bare wood should be primed with an exterior stain-blocking primer. All rust primer and repair areas should also be spot-primed before painting.
  7. Wrapping: landscaping should be covered with drop cloths or plastic. Air conditioning units, decks, and any unpainted surfaces should also be covered with drop cloths. Window and door openings should be covered with plastic prior to spraying. Cardboard shields are typically used along the roof line when painting fascia boards.
One major distinction between a reputable painting contractor and a less-than-reputable one is the amount of preparation that is included in a painting proposal. My experience is that 40-50% of the labor required in an exterior painting project is the prep work described above. If the house exterior hasn't been routinely maintained, the percentage of prep work will be higher.  
 
If you are collecting quotes for a project and find one of your bidders is significantly less than the others, one reason may be that he has not included the prep work required for a quality paint job. All too often, this leads to paint failure within 2-3 years.
The old adage that we get what we pay for rings true, especially when it comes to painting preparation.
 
Give us a call at 800.663.4944 to request an estimate or visit our website to learn more about Beach Painting.