Monday, November 10, 2014

Fall Maintenance Tips

 
Fall is the most enjoyable season for many of us who live on the Outer Banks. The mad rush of the tourists is over and the beaches are uncrowded and serene. One can't help but feel thankful for the abundant natural beauty that surrounds us.

It seems distant, but Winter is coming. Freezing temperatures and snow are usually short-lived here; nonetheless, diligent homeowners should be mindful of the following maintenance items:

Address Peeling Paint
Peeling is a sign of paint failure. Once the paint film has failed it can no longer protect your wood siding. Peeling paint should be removed by scraping and sanding as soon as it becomes visible. The bare surface should then be primed and fresh paint applied. If left alone, exposed siding will be susceptible to premature deterioration and rot.
 
Replace Failing Caulk
Caulk helps to keep the heat in your home and the moisture out. If your caulk is cracked or failing, it should be completely removed at the point of failure and new caulk should be applied.

Protect Your Decks
On the Outer Banks, we have periods of extended precipitation and occasionally we experience freezing temperatures. Moisture, combined with freezing and thawing, can wreak havoc on your decks. Consider having them sealed in the Fall. This will reduce cracking and splitting and extend the life of your decks.

Check For Visible Signs of Rot
Water penetration leads to excessive moisture and inevitably causes wood rot. It can also create an ideal habitat for termites. If you see signs of damage on your corner trim or door/window trim, it warrants further investigation.

Power Washing
Power washing not only cleans your house and decks, but it can also reveal failed caulking, peeling paint, cracked deck boards and dry rot.

Other Items
Gutters, chimneys and roof shingles should be checked before winter. It's also advisable to test and replace the batteries in your home's smoke and CO detectors as well.

The Fall season is a very busy time for us at Beach Painting. Don't wait too long to schedule your maintenance painting and carpentry repairs. This is also a great time to address any interior painting and drywall needs. Call us at 1-800-663-4944 or visit our website to schedule a free estimate.  

Thursday, October 23, 2014

Light and Color

Light Reflectance Value

Have you ever noticed how the color of your house can look different at different times of the day? Or how the walls of a room may seem warmer on a sunny morning and cooler at night when the lights are turned on? The way that the human eye perceives color involves several factors, but the primary factor is the Light Reflectance Value (LRV).

The LRV for a paint color can be found on color chips and fan decks at your local paint store. It’s a two-digit number that corresponds to the percentage of light reflected. Think of it this way, white reflects light and black absorbs light. A bright white paint will have an LRV of 85% and a pure black paint will have an LRV of 5%.  A higher LRV means a higher amount of light reflected.

Fan Deck with LRV for Various Colors
LRV is used by designers, color consultants and painters in the design of both interior and exterior spaces. Certain colors enhance the quality of lighting and others reduce the intensity. In a warm climate such as the Outer Banks, higher LRV colors might be used on the exterior to reflect sunlight and reduce energy costs. Conversely, in cold climates darker colors may be used to absorb sunlight.

The Impact of Sunlight
The way that sunlight changes through the course of a day is self-evident. Photographers are particularly aware of this. Morning sunlight is warmer from the perspective of color. It is more yellow. My mid-day, the sunlight develops a bluish cast. By late afternoon the sunlight is warm again, favoring red. Seasonally, Winter sun is cooler/bluer than it is in Summer.

Photo: Warm Colors Enhanced by Afternoon Sunlight
Artificial Light

Most indoor spaces rely on artificial light to supplement or replace natural light. The three types of artificial light found in most homes are incandescent, halogen, and fluorescent. Incandescent and halogen lighting are warmer. They enhance reds and yellows, so if you want a blue wall in a room with incandescent lighting, for example, you would tone the paint with a little red. Fluorescent lighting is cooler and enhances blues and greens.
Photo: Incandescent Lighting Enhances Warm Colors
 
Combinations
With most interiors, there are multiple combinations of light in play. The numberof windows in a room affect how much natural and artificial light are present at certain times, but you also need to consider which direction the windows face. In a room with southern exposure, you get more direct light. If the windows provide eastern exposure, you have more morning sun, while western exposure provides more afternoon sun.  Northern and western exposures provide cooler, bluish tones and southern/eastern exposures provide warmer, yellower tones.

Other Considerations
Other elements in a room can also affect your color perception by reflecting additional tones. Flooring, drapes, mirrors and area rugs can reflect a different color cast in certain lighting. For example, a red oak hardwood floor with direct sunlight through a window will enhance the warmth of a yellow wall. Sheen is normally chosen for its durability and hiding power, but it can also impact the perception of color by reflecting additional light. Higher gloss paints are typically used to draw your attention to detail on trim. Walls use flatter sheens because you don’t necessarily want to draw attention to a wall.

Summary
The LRV of a color lets you know how much light will be reflected on a painted surface. Colors and sheens can be selected or modified to reflect the quantity and quality of a room’s light sources. The objects and décor of your room can also influence how your eyes perceive a color. When selecting paint for your next project, try painting a 12” x 12” piece of cardboard or drywall. View the painted sample in different lighting conditions and in different areas of the room.

Terminology
To avoid confusion, you may want to familiarize yourself with these color terms.  

Tint: a color that has been lightened by adding white
Shade: a color that has been darkened by adding black

Tone: a color that has been modified by adding black and white

Chroma: brightness or dullness based on the purity of the color
Warm Colors: reds, oranges, yellows

Cool Colors: greens, blues, violets

Monday, October 6, 2014

Paint Problems - Peeling

The Paint Quality Institutes defines peeling as "loss of paint due to poor adhesion." Peeling can involve multiple coats and often begins with the original coat of paint. 
 
Photo from the Master Painters Institute

Some possible causes of peeling paint include seepage of water or moisture through uncaulked joints, failed caulking, excess moisture escaping through the exterior walls, inadequate surface preparation prior to painting, the use of low quality paint, or applying paint to a wet surface. In all cases, a repainted surface is only as good as the original coat of primer and paint.

While it seems intuitive that "more is better" when it comes to the number of coats of paint that your painting contractor proposes, there is a limit to the number of coats that a surface can support. As the paint thickness builds up over time, and the coatings get older, they lose their flexibility.

The Outer Banks is prone to extreme fluctuations in humidity which can cause the painted substrate to expand and contract. When the paint film is no longer flexible enough to move with the surface cracking or flaking of the coating usually results.

It is not uncommon to put a coat of paint on a surface that appears sound only to have many layers of
paint peel away. At this point, the necessary preparation for a repaint changes.

Photo from the Master Painters Institute
Peeling paint can be remedied by removing all loose paint with a scraper or wire brush after power washing. Any rough surfaces are then sanded and all bare wood is primed before recoating. This is generally the first course of action.
 
In extreme cases where the original coat of paint is failing after multiple repaints, the peeling areas should be stripped to remove all of the old coating, even where it does not appear to be peeling. This is especially true in the case of cedar shakes. Often times this is expensive, but if it is not done properly, a new paint job will likely continue to flake and peel. 
 
The time involved with scraping, sanding, and wire brushing can vary from 35 to 100 square feet per man-hour. It is impossible for anyone to know how long it will take to properly remove peeling paint, which is why most reputable painting contractors will bid the work as an allowance item.


Thursday, September 18, 2014

Competent Estimating


With the approach of fall and winter, this is the time to hire a contractor for any painting or carpentry jobs that you might want to have done before the next rental season. As you probably know, it will be difficult to get estimates in the spring, since most reputable contractors will be booked for months in advance.

Do yourself a favor and scrutinize the companies that you invite to estimate your work, because not all companies can competently estimate the work that they perform. You may think that a low-ball price wouldn’t be much of a concern to you, but that is far from true. What happens when the contractor runs out of money, time, and motivation? If this happens to you it will surely cost you more for another contractor to finish the work left by the guy who won’t return your calls anymore. Most likely, the contractor who finishes the job won’t give a warranty either, since he can’t vouch for the quality of the priming and prep work already completed.

Many contractors on the Outer Banks don’t know how to accurately measure and apply production rates, so it’s no surprise that they are simply guessing, rather than estimating their jobs. In some cases, that guess may be an educated one, but it is still just a guess. 

Unfortunately, most homeowners trust that each competing company has the expertise to provide an “apples” quote that he or she can compare to the other “apples” quotes provided. However, this is rarely the case. If you have ever hired a contractor, you know that the estimates can vary wildly in scope of work and price.

To estimate properly, a contractor must first have an hourly rate based on the actual cost of fixed and variable overhead, labor costs (including labor burden), and a reasonable profit.

Once the hourly rate is established, the estimator must know capabilities of the employees who will complete each aspect of the job. The production rate for each given task is then applied to the measurements for that specific scope of work.

If the proper measurements and production rates are applied to an estimate, this allows the estimator to factually negotiate any aspect of the quote honestly and ethically. A measured item won’t change, but the scope of work and specified materials can change to fit within budget constraints. While this doesn’t seem too complicated, it does require plenty of work for the business to document and establish production rates. For many small business owners, this never happens. Often they are too occupied working for the business rather than working on the business.

According to the R.S. Means Company (the oldest and most reliable source of construction data) the national average for a professional painting contractor is currently over $55.00 per hour. While there is some variance regionally, beware if your contractor is charging significantly less than his competitors. He probably has not come to that figure by any scientific method. Make sure that your contractor knows how many square feet of siding or lineal feet of trim he’s installing or painting. If he can’t tell you exactly how much, you could end up as the victim of a badly flawed estimate.  

Monday, September 8, 2014

Fall - Timing is Everything

On the Outer Banks, fall is typically a time anticipated by sportsmen and anglers worldwide. For home owners, real estate professionals, and property managers, fall is the time to plan your improvements and execute property maintenance programs in preparation for the upcoming summer rental season. 

As most of us on the Outer Banks know, this area can try the patience of a saint when it comes to getting required maintenance work done (or any other work for that matter). There is a pervasive, relaxed work ethic that translates into unreturned phone calls and eventually frustration on the part of anyone wanting work performed.

Consider using a reliable, full-service painting company that offers a maintenance program. Dealing with fewer contractors leaves less room for errors and should provide you with more personalized service.
You may be surprised at how versatile a professional painting contractor can be in the scope of services offered. This can complement the services offered by your rental company and in most cases provide you with a much more complete and professional interior and exterior maintenance package.
With any job there is a logical starting point. With yearly maintenance, exterior cleaning and power washing will provide great bang for your buck.

Once the house has been cleaned, you can begin prioritizing what needs to be done in order of importance and in accordance with your budget. Often, cleaning is all that is needed to make the outside of your property look fresh and suitable for guests, but certainly this process can reveal latent problems.
While cleaning the house, your professional should look for (and take note of) rotten siding, missing roof shingles, bad caulking, peeling paint, broken windows, and other such problems. This is the best time to have these problems reported to you so that they can be dealt with in an effective and timely manner. This needs to be on the top of your to-do list. While these items may seem minor, they almost always lead to more costly repairs if ignored.

You are best served to use a painting contractor with the skills to tackle these problems. Your ideal painting contractor should be able to replace siding, repair wood rot per building code, replace windows and flashing, repair drywall, and repair decks and rails.
What about the interior of your home? The most misunderstood issue that we address each year on the interior of homes is in the area of touch-up versus repainting.
You should understand that unless you know the exact product and color that was used in the painting of your interior, it’s not likely that you will be able to touch it up flawlessly. With interior touch-up, the end result should be that you cannot see where touch-up was performed.  
A good painting contractor should also keep extensive records for you so that you’re not guessing every year when it’s time to do interior touch-up painting.
Call us today and we can review your property and suggest a maintenance program that addresses your painting and carpentry needs. Remember that timing is everything and any good contractor will likely be fully booked in the spring, so don’t wait to take care of your maintenance, construction, and painting needs.

Thursday, August 28, 2014

D.I.Y. - Minor Drywall Repairs

Minor drywall repairs are not as daunting as they may seem, even when we're talking about holes that are three to six inches in diameter. Following the PDCA's operating procedures, you can repair your drywall like a pro.
 
Tools and Materials:
Mud Pan
 
All-Purpose Joint Compound
 
Self-Adhesive Mesh Repair Screen or Tape
 
Drywall Knife
 
 
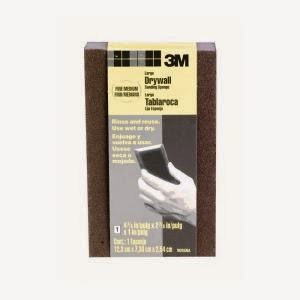
Sanding Block
 
Procedure:
  • Take the mesh screen or tape and cut so that it overlaps the hole sufficiently enough to support.
  • Attach the screen or tape over the hole.
  • Apply joint compound to thinly cover the metal screen or tape and overlap 2 inches onto the wall from the edge of the screen. Allow to dry.
  • After sufficient drying time, lightly sand the joint compound.
  • Apply 2nd coat of joint compound, extending approximately 4 – 6 inches onto the wall from the edge of the screen. Allow to dry.
  • When dry, sand and inspect the patch. Repeat as many times as needed. A lightweight joint compound can reduce the amount of sanding required.  
  • When coverage is sufficient, sand the area with the sanding block to blend into the existing wall area. Make sure to use a fine grit block when sanding the final coat.
  • Apply primer and paint to match existing.


Monday, August 25, 2014

Back to School, Back to Work


Whew! Another rental season almost in the books. It’s time for the kids to head back to school and time for many residents here on the OBX to resume the laid-back lifestyles of island dwellers…but for all of us here at Beach Painting Contractors, it’s time to get busy again.

It may seem a bit early to start thinking about the next season, but if you suspect you have moisture and rot problems, you won’t want to wait. Water infiltration is more likely to be problematic in the Fall and Winter months and could lead to prolific damage. If your house requires extensive repairs, it may be difficult to complete the work before the rental season if you wait until Spring.   


It appears counterintuitive to paint or repair the exterior of a house in the Winter, and that may be so in the Mid-Atlantic and Midwest; however, the average fall and winter temperatures on the Outer Banks are typically conducive to exterior painting. Sure, we are occasionally slowed down by a protracted cold spell, or even a dusting of snow, but for the most part we perform exterior work year round.  


So why wait to schedule your work? You can rest easy while the painting and repair work of other rental properties reach a frenetic pace from February to May. Some folks may find it difficult to have their work done by a competent contractor, if they wait too long. There will always be people working for beer money who may be able to help, but is that really a homeowner’s ideal situation?